Editing the Contents of a File
You can edit a one-page plain text or tabular data (CSV, TSV) file that you own, both in the file view and in the Tabular View. In order to do so, you adjust the Page Size (KB) slider until all of the data is displayed on one page.
If the file is too large, you can:
- Create a copy of the file by downloading the file, editing it as needed, and then uploading it into the DE as a new file.
- Copy a large file in the Data Store using the iCommands command line utility. For more information, see Using iCommands.
In the Data window, search for the file or folder. You may want to add the Path column to view the path.
To perform an advanced query, such as including or excluding wors in a file or folder name, searching for metadata attribute or value, file size range, created or modified date, owner, shared recipient, or tag, see Searching for Data Items. Click the chekbox for the file you own.
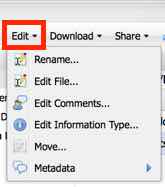
Click Edit and then click Edit File.
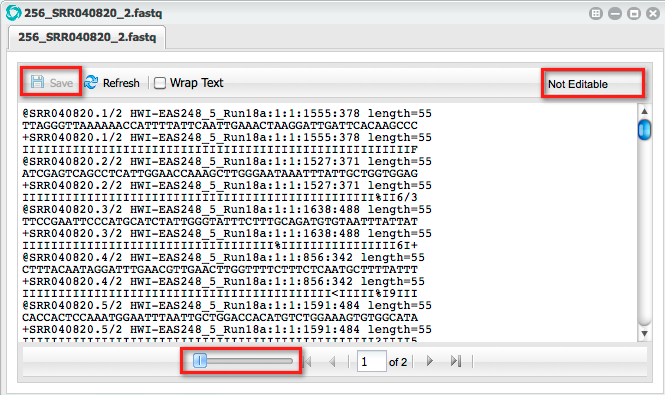
When you first open the file, the Page Size (KB) slider by default is at the far left position, more than one page is displayed in the page navigation (unless the file is very small), the Save button is not enabled, and Not Editable is displayed.

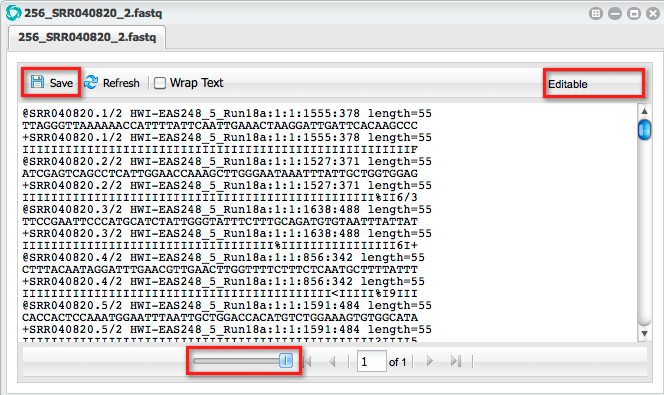
Drag the Page Size (KB) slider until the page navigation at the bottom displays 1 of 1.

Once page 1 of 1 is displayed, the file becomes editable. If the file still is not editable, youn either don’t have Own permissions to the file, the file is not an editable text file, or it is too large.
Edit the file.
When done, click Save.
Editing a File’s Info-type
When a file is imported or uploaded, it is auto-assigned an info-type to identify the type of data it contains. You can change or assign the info-type for a file you own or to which you have write permissions. File-type auto-detection is available mfor text files, including .bam, .csv, .fasta, .fastq, .fa, .fq, .nwk, .newick, .phylip, .tsv, and more.
| The automatic info-type assignment is an asynchronous process that is dependent on other requests in the queue, which may cause a delay until the info-type is assigned. You can manually assign the info-type immediately, if necessary. |
In the Data window, click the file you own. The Info-Type row in the details section on the right displays the current info-type, if any.
To define or change the info-type:
- Either click Select (if the info-type has not yet been defined) or click the current info-type in the Details section on the right, or click the Edit menu and then click Edit Information Type.
- In the Select Type drop-down list, select the info-type to use.
File type not in the list? If your file type is not in the list, email CyVerse Support with the sample file to be added to the list.
- Click OK.
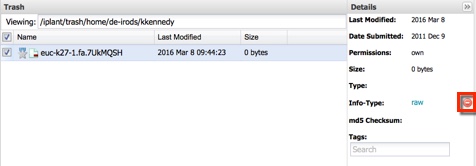
To remove the info-type, click
next to the Info-Type displayed in the Details section.
Moving a Data File or Folder
You can move files or folders in your personal folder or that have been shared with you with Own permissions. Be aware that this will change the name for all other users who own or have share rights to that file or folder. You also can open a new window and drag the item from one window to the other or use the Edit menu.
There is a limit of 1000 items (all files within all subfolders under the parent folder) per move. If the folder contains more than 1000 items, you can either create a new folder with the name to use, move up to 1000 files at a time until all files have been moved to the new folder, and then delete the older folder, or move them using iCommands.
- In the Data window, search for the file or folder. You may want to add the Path column to view the path.
To perform an advanced query, such as including or excluding words in a file or folder name, searching for metadata attribute or value, file size range, created or modified date, owner, shared recipient, or tag, see Searching for Data items.
To drag a file or folder to a different window:
- Click to select the file or folder.
- Open a new Data window..
- Drag the item in one window to the new location in the other window.
To use the Edit menu:
- Click the item to move.
- Click Edit, click Move, naviagte to the target folder location, and click OK.
Renaming a Data File or Folder
You can rename a file or folder that is in your personal folder or one that has been shared with you. Be aware that renaming a shared item also renames it for all other users who own or have share rights to that file or folder.
You can rename a folder that contains up to 1000 items (all files within all subfolders under the parent folder). If the folder contains more than 1000 items, you must either rename the folder using iCommands, or you can create a new folder in the DE with the name to use, move up to 1000 files at a time until all files have been moved to the new folder, and then delete the older folder.
- In the Data window, search for the file or folder. You may want to add the Path column to view the path.
To perform an advanced query, such as including or excluding words in a file or folder name, searching for metadata attribute or value, file size range, created or modified date, owner, shared recipient, or tag, see Searching for Data Items.
- In the middle section, select the data files or items (up to 1000) to rename.
- Click Edit and then click Rename.
- Enter a unique name (see Using Special Characters in the DE for notes about file and folder names), and click OK.
Viewing and Customizing Data Files
You can view data files, raw data, and CSV and TSV files in tabular or comma-delimited view. You also can sort, filter, and show or hide columns in some CSV and TSV files, and edit text files you own. The information that is viewable or editable is dependent on the type of file chosen. Before you begin, you may want to watch a YouTube video on file creation, editing, and tabular views.
- In the Data window, find the file.
If you get a message that there are no items to display, it is possible the folder or file has a special character in its name.
- Click to open the file.
Viewing and Customizing CSV and TSV files
In addition to the default (delimited) tab view for CSV and TSV files, files that have been defined with an info-type of CSV or TSV also display a Tabular View tab, within which you can add or remove rows, skip first lines, define the first row header, as well as sort, filter, and show or hide columns.
In the Data window, click to open the CSV or TSV file to view:
Sorting, filtering, and customizing columns in CSV and TSV files
In CSV and TSV files with the Tabular View tab (the file must be defined with an info-type of either CSV or TSV), you can sort and filter columns, and hide or show columns to customize the look of your list.
- In the open CSV or TSV file, hover over the file’s column header until a down arrow is displayed:

Click the down arrrow:
- Sort Ascending or Sort Descending: To sort on the column, click either Sort Ascending or Sort Descending.
- Columns: To hide or show a column, point to Columns and then select or clear the checkbox for the column to show or hide.
To filter on data in the column:
- Point to Filters.
- In the text box, enter the filter text (not case-sensitive). The list is filtered for the query you entered.
Viewing, adding, and retracting data comments
You can view comments by other users about a file or folder, add comments to any file, and retract any comments you made. You also can retract comments made by other users if you are an owner of the item. Retraction removes the content of the comment but leaves the author’s name and date the comment was added.
- In the Data window, search for the file or folder. You may want to add the Path column to view the path.
To perform an advanced query, such as including or excluding words in a file or folder name, searching for metadata attribute or value, file size range, created or modified date, owner, shared recipient, or tag, see Searching for Data Items.
Click
on the right side of the row, or click the Edit menu and then click Edit Comments.
Either:
- To add a comment, click in the lower text box and enter your comment, and then click Add. Your comment is added to the top section and now visible to other users.
- To retract a comment, click Retract in the Comments window, and then click Yes in the confirmation prompt. Your comment text is removed and is replaced with This comment is retracted.
Deleting Files and Folders (Trash)
You can delete a file or folder in your personal folder, or a file or folder that has been shared with you with Own permissions, which moves it to your Trash folder. Deleting a shared item also deletes it for all other users who own or have share rights to that file or folder. After you have deleted a file or folder, you can view the list of items in the Trash, restore a deleted file or folder, and permanently delete some or all items.
There is a limit of 1000 items (all files within all subfolders under the parent folder) per delete, restore, or permanent deletion. If the folder contains more than 1000 items, you can either delete up to 1000 files at a time until all files have been moved to your Trash, or move them using iCommands.
- In the Data window, select the file or folder to delete in your middle section.
- Click File and then click Move to Trash.
Move to Trash not available? You must be an owner of the file or folder to delete it. You can view your rights to the item in the Details panel on the right on the Permissions line. The deleted item is moved to your Trash folder and is no longer accessible to other users who have shared access to it, even if they are co-owners of the item. (You may need to refresh the page and/or browser window to verify that the item is removed).
You can view the list of items in the Trash, restore a deleted file or folder, and permanently delete all or selected items in the Trash.
Managing deleted data items in the Trash
Deleted items are moved to the Trash folder of the user who deleted them, and that person is the only person who can restore or permanently delete it.
You can restore an item you deleted to the location in which it was stored before you deleted it. When you know an item is no longer needed, you can either empty the Trash folder to permanently delete all items in the list, or you can delete just some of the items.
Opening the Trash folder
In the Data window, either:
- Click Trash on the top right and then click Open Trash

or
Click the Trash folder in your Navigation list.
The list of deleted files and folders is displayed.
When an item is moved to the Trash folder, additional random alphanumeric characters are added to the end of the name to distinguish it from other items with the same name, and an icon to the left shows a red minus sign: 
Restoring a deleted file or folder
The person who deleted the file or folder can restore it from the Trash to its previous location.
- Open the Trash.
- In the Trash list, select the data item or items to restore.
- Click Trash again and then click Restore. Each item is restored to its original name and previous location.
Emptying the Trash (Permanently deleting all items in the Trash)
If you know that you no longer any of the files or folders you previously deleted, you can empty the Trash folder.
| This action cannot be undone! |
| Once the Trash is emptied, the items cannot be restored. |
- Open the Trash.
- Review the items in the Trash list to make sure you want to delete them all. (If you want to keep some of the items, skip to the next section.)
- Click Trash again and then click Empty Trash.
- Click Yes in the warning prompt.
Permanently deleting selected items in the Trash
| This action cannot be undone! |
| Once the Trash is emptied, the items cannot be restored. |
- Open the Trash.
- In the Trash list, click the checkbox next to the files or folders to permanently delete.
- Click Trash again and then click Delete.
- Click Yes in the warning prompt.
Using Data Favorites
You can create a short list of the Data files and folders you use most frequently.
Adding an item to your data Favorites list
- In the Data window, find the file or folder to add to your Favorites list.
- Click the star to the left of the name in the middle section:
The star now is yellow and the app is listed in your Favorites folder at the bottom of the Navigation list. Note that the path of the file or folder is displayed.
Removing an item from your data Favorites list
- Click the Favorites folder at the bottom of your Navigation list.
- Click the yellow star to the left of the data item to remove it from your Favorites list.
Viewing your data Favorites list
- Click the Favorites folder at the bottom of the Navigation list. The list of your favorite data items and their paths is displayed.
- To view or open an item, verify the correct location in the Path column, and click the name.
Fix or improve this documentation:
- On Github: Github Repo Link
- Send feedback: Tutorials@CyVerse.org
- Live chat/help: Click on the
 on the bottom-right of the page for questions on documentation

