Sharing Data Files and Folders
You can share files and folders you own in your personal folder with any CyVerse user via the Discovery Environment. By default, recipients with accounts receive read-only permissions to the specifically shared data item, folder, or subfolder. The owner who shared the item can change the permission level to write, own, or back to read for each recipient on a per-item basis. Changing to own grants full rights (ability to rename, move, and delete) to the item so should be done with care. You also can unshare the file or folder on a per-item basis. Files and folders that have been shared via the DE can be accessed in the user’s Shared With Me folder in his or her Data list in the DE. Clicking the notification of the shared file also opens the folder. For instructions on how recipients can access shared items, see Accessing Shared Files and Folders. CyVerse users can also create a list of those Collaborators you most frequently share with, and request a permanent identifier (a DOI or ARK) for easy sharing. Data files of up to 2 GB can be shared with the public and anonymous users (no account required) by sending a Public Link for files you own, which allows anyone with the link to download the file in order to view, analyze, and manipulate it on his or her system, independent of the CyVerse Data Store or the need for an account. Before you begin, you may want to watch a video about data sharing in the Discovery Environment (current for version 1.6).
Sharing and Unsharing Data Files and Folders in the DE
Before you begin, you may want to read an overview about sharing data files and folders in the DE above. You can share an item you own with someone in your Collaborators list or any other DE user. Access is granted only to the specifically shared data item, folder, or subfolder. You also can request a permanent identifier (a DOI or ARK) within the DE. For information on how to do so, see Requesting a Permanent Identifier in the Data Commons.
Sharing a file or folder
Step 2: Select the recipients
Either:
- Select a user in your Collaborators list: Click Choose Collaborators, select the user, click OK, and then click Done.
or
- Search for any CyVerse use by clicking in the search field, begin entering the user’s name, and then click the user’s name from the list.
Step 3: Changing the permission level
Either:
- To allow the user only to read the item, leave the Permissions level at read.
- To allow the user to add metadata and change the info-type, click write.
- To grant the user full access to the item, including the ability to rename, move, and delete, click own.
Use Caution Learn more about permission levels before you grant this ownership level. Repeat for each user.
Click Done.
Both the sharer and the recipient recieve notification that the data item has been shared.
Unsharing a file or folder in the Data window
- Find and select the shared data item you own to which you want to revoke sharing.
- Either click
next to the item, or click the checkbox for the item and then click the Share menu and then click Share with Collaborators.
- Click
.
- Click Done.
Sharing Data Files Via Public Links
You can create and send a public link to a data file (though not for a folder) you own. Once the recipient has the link to the file, it can be downloaded for purposes of validating, manipulating, or analyzing the file or results on their system.
The advantages are that the recipient does not have to have a CyVerse account in order to download the file through the link, and the original file is not affected because the downloaded file is used on his or her system instead of in the CyVerse Data Store.
You can send the same public link to more than one recipient, or create separate public links for each recipient. Separate public links are useful when you want to share or revoke access to the same file on a per-recipient basis, while sending the same link to a group of recipients allows you to share or revoke access to the file in one action.
To create the public link, the owner selects the file, creates the link, and then emails, tweets, or text the link to the recipient.
- If you previously shared the file in the DE, clicking the link takes the recipient CyVerse user to the Shared With Me folder under the name of the owner who shared the file. From there, the recipient can download or view the shared file within that Shared With Me folder.
- If you have not shared the file, clicking the link opens a download window from which the recipient can download the file.
| Recipient has the file? Deactivate it. |
| Once the recipient has downloaded the file using the public link, it is recommended that you deactivate the link. |
You can create a public link to a file you own in several different ways: by creating the URL to the file from which the user can import the file via URL to the DE, or by creating an iRODS iget iCommand, the Gnu Wget command, or cURL statement. Once the link is created, you copy the link and send the message.
You also can send a shared path folder link to a DE user so that any files that have been shared with that recipient are available and share data files you own with the public in the Mirrors site.
| For more information about other methods of accessing data, see Downloading and Uploading Data. |
Creating a public link in the Data window
The quickest way to create a public link is in the Data window.
- In the middle section of the Data window, select the file to which you want to create the public link and then click
.
If is not displayed, you are not the owner.
- In the Manage Data Links window, copy the link to send and click Done.
- Open the message application to use (email client, twitter, or chat window) and paste the link to the item.
- Send the message.
Managing your public links in the Manage Links window
While you can quickly create a public link in a couple of steps right in the Data window, the real meat of using public links is in the Manage Public Links window. From this window, you can create or copy an existing one, delete data links, and access advanced sharing to send a URL that allows the user to upload the file via URL to the DE, or send iRods iCommands, Wget, or cURL commands.
Step 1: Open the Manage Data Links window
- In the middle section of the Data window, select the file.
- Click the Share menu and then click Create a Public Link.
Step 3: Delete the public link
- Public links are accessible to everyone who has the link. We recommend that you delete the link once you have verified that the recipient has downloaded it.
- Open the Manage Public Links window.
- Click the red icon to the left of the file:

The public link is removed from the file, and future attempts to download it will display the message, “That ticket does not exist”.
Accessing Shared Files and Folders
When a file owner shares a data file or folder with another CyVerse user, the recipient receives a notification message about the shared data item and the Shared With Me folder is displayed. You can access the file either from the Notifications list or from the Shared With Me folder in the Data window.
The permissions you have for the shared item are set by the file owner who shared the data item with you. By default, permissions are set to read only. For more information, see Changing and Viewing Data Permission Levels in the DE.
- In the Data window, click to open the Shared With Me folder.
The Shared With Me folder is displayed only when at least one data item has been shared with you.
- Click to open the CyVerse user’s folder containing the shared item.
You also can access shared data items from the Notifications list:
- Click
at the top right of the screen.
- Click the message about the shared item.
You may need to click See all notifications (only visible when you have unread notifications). The Data window opens to the shared folder containing the data item that was shared.
Problems?
If you can’t access a shared file or folder, contact the owner to verify that the item has been shared with your CyVerse username.
Unsharing Files and Folders
You can remove the shared file permission for a user for a data item you own.
In the Data window, search for the file or folder. You may want to add the Path column to view the path.
To perform an advanced query, such as including or excluding words in a file or folder name, searching for metadata attribute or value, file size range, created or modified date, owner, shared recipient, or tag, see Searching for Data Items. Click
in the row for the item to unshare.
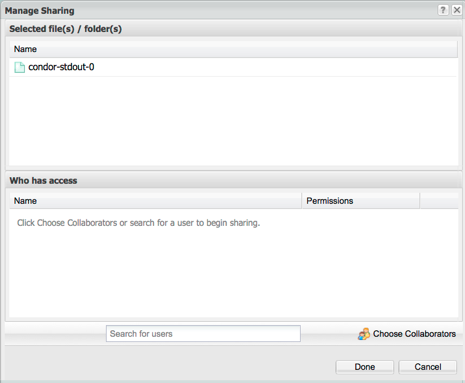
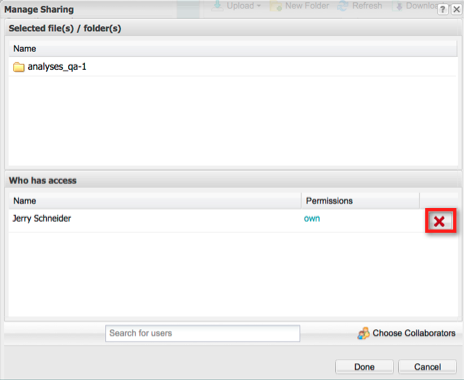
In the Who has access list:
- Verify the file to unshare is listed in the top section.
- Next to the user with whom you want to unshare the file, click the Delete icon on the right.
- Click Done.
See Sharing Data Files and Folders for information on how to share data items with users.
You can remove the shared file permission for a user for a data item you own.
- In the Data window, search for the file or folder. You may want to add the Path column to view the path.
To perform an advanced query, such as including or excluding words in a file or folder name, searching for metadata attribute or value, file size range, created or modified date, owner, shared recipient, or tag, see Searching for Data Items.
Click
in the row for the item to unshare.
In the Who has access list:
- Verify the file to unshare is listed in the top section.
- Next to the user with whom you want to unshare the file, click the Delete icon on the right.

- Click Done.
See Sharing Data Files and Folders for information on how to share data items with users.
You can remove the shared file permission for a user for a data item you own.
- In the Data window, search for the file or folder. You may want to add the Path column to view the path.
To perform an advanced query, such as including or excluding words in a file or folder name, searching for metadata attribute or value, file size range, created or modified date, owner, shared recipient, or tag, see Searching for Data Items.
Click
in the row for the item to unshare.
In the Who has access list:
- Verify the file to unshare is listed in the top section.
- Next to the user with whom you want to unshare the file, click the Delete icon on the right.

- Click Done.
See Sharing Data Files and Folders for information on how to share data items with users.
Changing and Viewing Data Permission Levels in the DE
As part of data sharing, you can specify the permission level the recipient has for the shared data item or analysis. This page discusses how to do it in the Discovery Environment, but you can also view permission levels for a data item using iCommands. The permission level also affects the metadata for the data item.
By default, recipients are granted read-only access to shared data items. Permission levels range from read-only, write, and own, as noted in the following tables.
| Permission Level (Set within the DE)* | Read | Download | Info Types | Rename | Move | Delete |
|---|---|---|---|---|---|---|
| Read |  |
 |
||||
| Write |  |
 |
 |
 |
||
| Own |  |
 |
 |
 |
 |
 |
* With the 2.11 release, you now can share analysis results that used unpublished Agave apps or workflows. Unless you are an experienced Agave user, we recommend you set data permissions within the DE instead of within Agave to avoid conflicts. For more information, see Sharing and Unsharing an Analysis.
Changing the permission level for a data item in the DE
- In the Data window, search for the file or folder. You may want to add the Path column to view the path.
To perform an advanced query, such as including or excluding words in a file or folder name, searching for metadata attribute or value, file size range, created or modified date, owner, shared recipient, or tag, see Searching for Data Items.
- Click
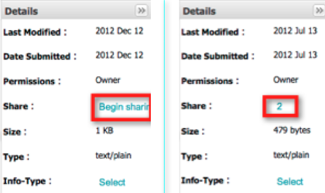
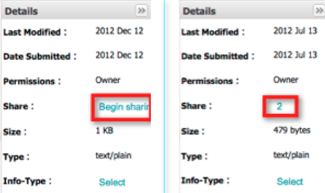
on the row of the data item. (You also can click either Begin sharing (if the item has not been shared) or click the numeral in the Share line (displaying the number of users with whom the item has been shared) in the Details section of the selected item.)
In the Who has access list, find the user whose permissions you want to change for the item.
User not listed?
- If the user is not listed, you must first share the item with the user.
Click in the Permissions column for the user and change the permission according to the table above.
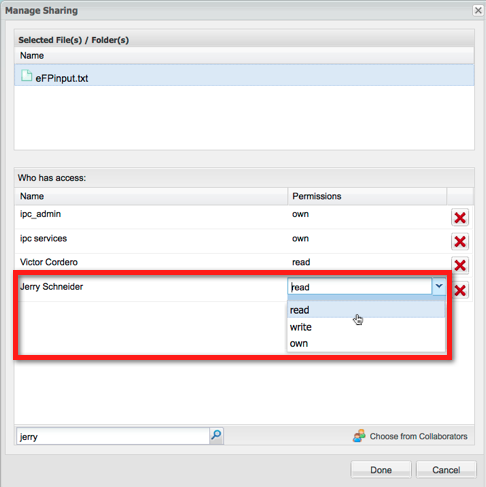
Caution Once you have shared ownership with another user, the new co-owner has full access to the item, including the ability to rename the item to a name you don’t recognize, move the item to a different folder (for example, to a folder to which you don’t have access), or even delete the item. Actions taken on a co-owned data item affect all users who have been granted rights to the item.
- Click Done.
Viewing the permission level for a data item in the DE
- Find the data item whose permission level you want to check.
- Click the checkbox for the item.
- View the permission level in the Details panel on the right.
For more information on data sharing, see Sharing Data Files and Folders.
Viewing Genome Files in the Genome Browser, CoGe, and Tree Viewer
You can view genome files in CoGe or external Genome Browsers, and tree files in the Tree Viewer.
Viewing Genome Files in CoGe
You can view Fasta info-type genome files you own in CoGe. You must have access to CoGe in your CyVerse account.
| Looking for how to load your genome file into CoGe? |
| See How to load genomes into CoGe on the CoGePedia website. |
- In the Data window, search for the file or folder. You may want to add the Path column to view the path.
To perform an advanced query, such as including or excluding words in a file or folder name, searching for metadata attribute or value, file size range, created or modified date, owner, shared recipient, or tag, see Searching for Data Items.
Click the checkbox for the file and:
- Verify the Permissions row in the Details pane shows own.
- Verify the Info-Type in the Details section on the right shows fasta. If not, change the info-type to fasta.
Click CoGe in the Send to line of the Details pane (or click the Share menu and then click Send to CoGe).
In the CoGe prompt, click the here link to load and visualize the genome in CoGe.
In the Loading Genome dialog, click GO to view the genome, or click the drop-down list and select either Load Annotations or Load Another Genome and then click GO.
When done, click Sign-out.
Viewing Genome Files in a Genome Browser
You can view bam, vcf, gff, gtf, and—new for the 2.11 release—bed, bigBed, and bigWig—genome files you own in the genome browsers at Ensembl, UCSC, IGV, GBrowse, jbrowse, and (new for 2.11) the WashU EPIGenome Browser. The files must be tagged with the info-type for that file. You also can view genome files in CoGe and view Newick files in the Tree Viewer.
- Open the Data window.
- In the Data window, find the bam, vcf, gff, btf, bed, bigBed, or bigWig file you own. (Hint: If
is not displayed in the file’s right column, you don’t own the file. You can download and upload it to your personal directory to give you own permissions.) Example data can be retrieved in Data Commons at http://datacommons.cyverse.org/browse/iplant/home/shared/iplant_public_test/by-range or via the DE under Community Data>>iplant_public_test/by-range.
About file requirements Genome file requirements depend on the file type.
Bam and vcf files require a matching index file (bam.bai or vcf.vci) to tell it which part of the genome to load, and both files must in the same directory with the same name. For example, if the file is named sample.bam, its index file must be in the same directory and named sample.bam.bai.
Gff, gtf, bed, bigBed, and bigWig files require that the name of the reference genome’s fasta header match the gene name in the gff, gtf, bed, bigBed and bigWig file.
- Click the checkbox for the files to send.
- In the Details section on the right, verify that the Info-Type shows the correct type, and change the info-type if necessary.
- In the Details pane, click Genome Browser:
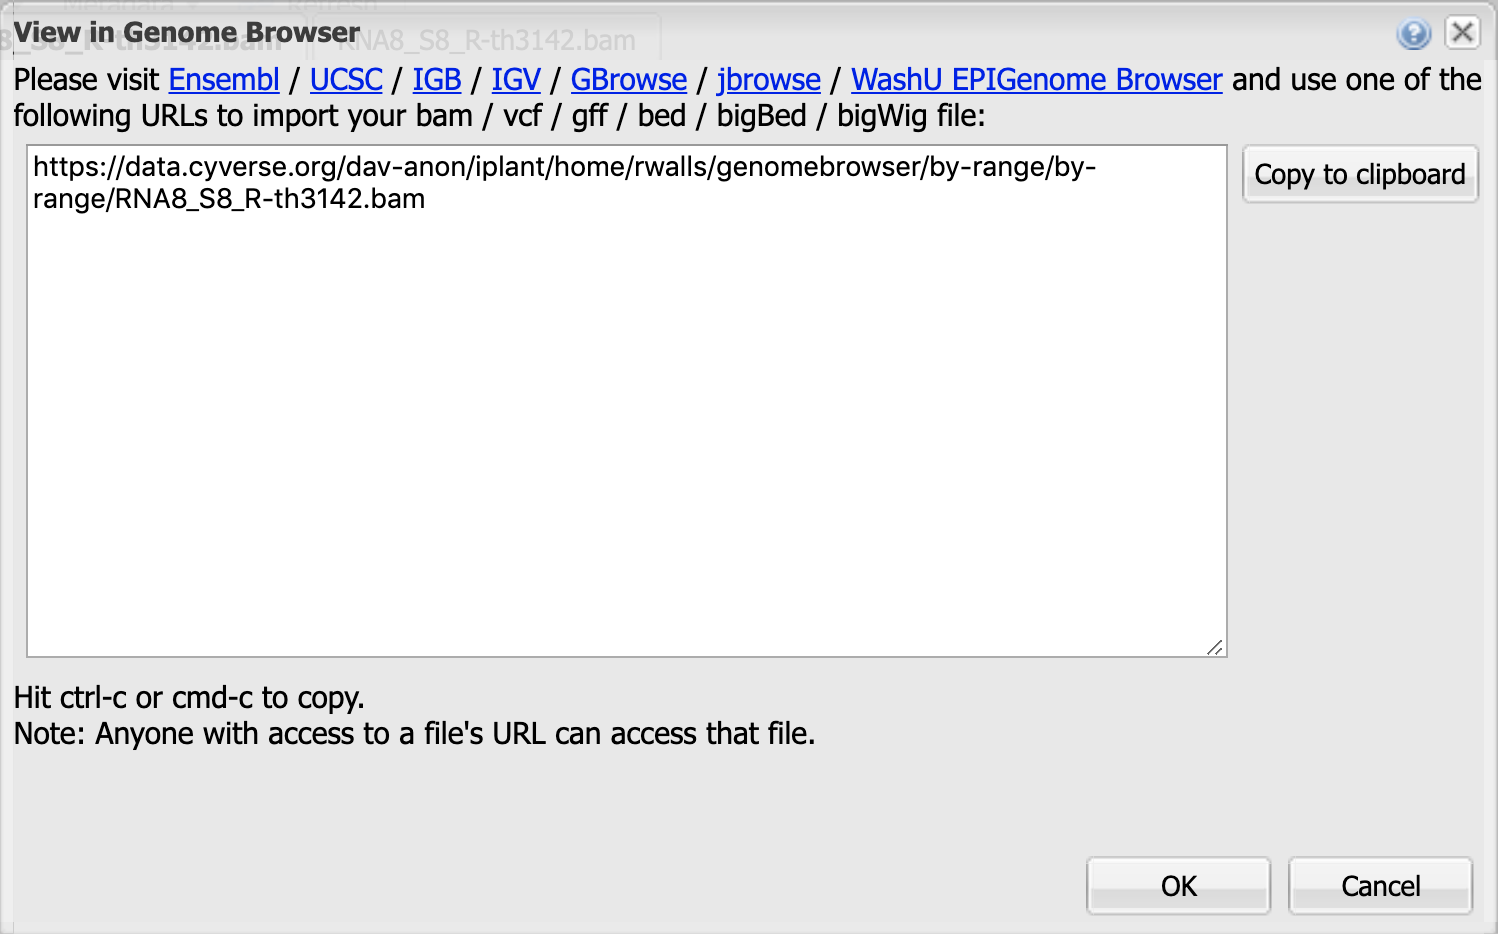
In the View in Genome Browser dialog:
- Copy the URL to the file.
- Click the link for the genome browser to use.
- Click OK. Note: If you have an issue, you may need to change https:// to http:// in the URL.
Viewing Newick Files in the Tree Viewer
You can view newick info-type genome files you own in the Tree Viewer. You also can view genome files in the Genome Browser and in CoGe.
In the Data window, find the Newick tree file you own.
Verify the Info-Type in the Details section on the right shows newick. If not, click Select or the displayed info-type link (you must have Own permissions), select newick from the list, and then click OK.
Click to select the file and then either:
- Click the Share menu and then click Send to Tree Viewer.
or
- Click Tree Viewer in the Details pane.
On the Visualization tab:
- Click Send to Tree Viewer.
- Click the URL.
When done viewing the tree, click to close.
About Reference Genomes
Genome Services release information
The Discovery Environment has a number of reference genomes uploaded and available for use. View the list here. If the genome you want to use is not listed, contact CyVerse Support to ask that it be added.
iPlant Genome Services Release build 0.2.1 Thu June 7 05:50:32 2012
CyVerse Genome Services has moved temporarily to using species data provided by Ensembl as the basis for bioinformatic support files. This release of Genome Services makes support available for all the species in Ensembl Plants v13, as well as several new animal species from Ensembl Metazoa 67. We are working on a solution to support species not catalogued by Ensembl in a future release.
This data is available for analysis in the:
Fix or improve this documentation:
- On Github: Github Repo Link
- Send feedback: Tutorials@CyVerse.org
- Live chat/help: Click on the
 on the bottom-right of the page for questions on documentation

